Projects Screen Overview
Your home screen in Atarim — every project you work on, how to add more, and how to find the one you need.
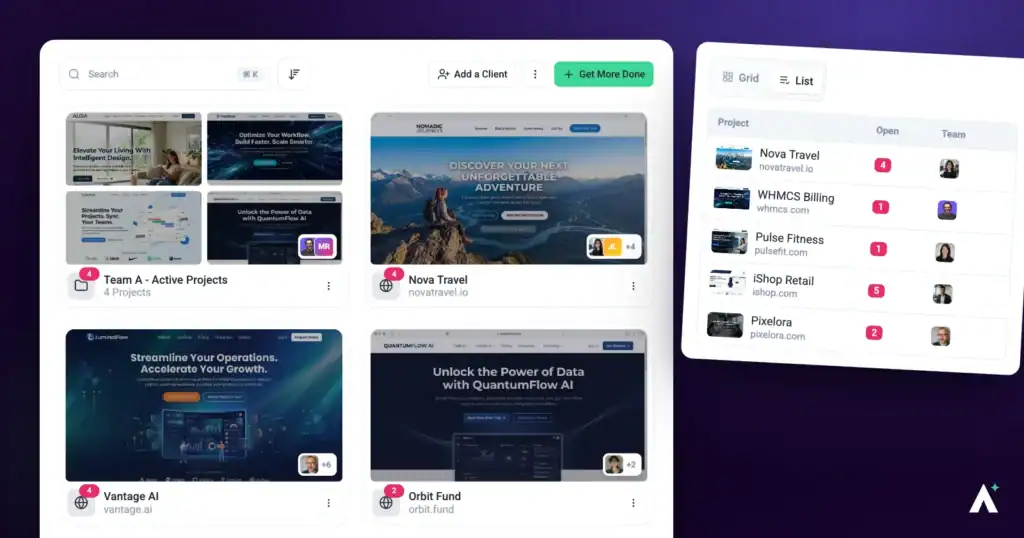
The Projects screen is where Atarim opens. Everything you work on lives here as a project — a website, a set of designs, or a page you are collecting feedback on — and every other part of the product is reached by opening one.
You may see this called the Websites screen in older material. They are the same screen — projects is the current term, and it covers more than websites. A project can be a live site connected through the WordPress plugin, a site added by URL, a site connected with a script, or a set of designs and images.
What you can add here
Select Add new, the first card on the Projects screen, or choose Add new from the ⋮ menu at the top right. A panel opens asking What do you want to add? Hover an option to see what it is for. Which options you see depends on your role. The Connect via MCP button at the top of the screen opens the same panel on Connect an AI client.
| Option | Use it for |
|---|---|
| Drop a URL | Any public website, by URL. Nothing to install, and the quickest way to start. |
| Manage a WordPress site | A WordPress site connected through the Atarim plugin. It opens your site’s WordPress admin so you can install the plugin. |
| Upload designs or PDFs | Mockups, PDFs, images and other design files you want feedback on. |
| Connect to Figma | A Figma file, imported from its link. |
| Create a folder | A folder to group projects together. |
| Connect an AI client | Setup steps for working with Atarim from your own AI coding tool. |
Each option opens its own panel. Drop a URL is the quickest: enter an address and the project is created in seconds. To connect an existing website project with a script instead, open its card’s ⋮ menu and select Connect the website.
Each method has its own requirements and setup steps. Learn More About Creating Your First Project.
What a project card shows
Each project appears as a card carrying several pieces of information at a glance.
| On the card | What it tells you |
|---|---|
| Thumbnail | An automatically captured image of the site. Design projects show the design itself instead. |
| Project name | What you named it when adding it. Select the name to rename the project in place. |
| Assigned people | An avatar stack in the corner showing who is on the project. Two faces are shown, with a count for anyone beyond that. |
| Milestone badge | Where a milestone is set, its name and how far away the due date is — for example Launch — in 12 days. Its colour reflects how close or overdue it is. Selecting it opens the milestone. |
| Task count | How much work is outstanding on the project. |
Hover a card to show its buttons. The ⋮ menu on the card also has Manage tasks, which opens the project in your Inbox, and View on Kanban, which opens it on Boards.
| Action | What it opens |
|---|---|
| Open | Opens the live site with Atarim’s visual feedback tools on top. Its tooltip reads Visually collaborate on this project. |
| Share | Invites stakeholders so they can create tasks on this project. |
| Manage | Opens the project dashboard (Beta). |
The Artifacts card on the grid isn’t a project. It collects the reports and audits Atarim generates for you, and it doesn’t use a project slot. Learn More About Artifacts.
Choosing the right action
Open, Manage tasks and View on Kanban show the same tasks in different shapes, which is the part that confuses people first time.
| If you want to… | Use |
|---|---|
| Point at something on the page and describe the change | Open — the visual layer over the live site |
| Work through a list of what is outstanding | Manage tasks, in the card’s ⋮ menu |
| See work moving between stages, or drag it along | View on Kanban, in the card’s ⋮ menu |
| Bring a client or stakeholder in | Share |
| See the project’s overview, settings, and AI activity | Manage (Beta) |
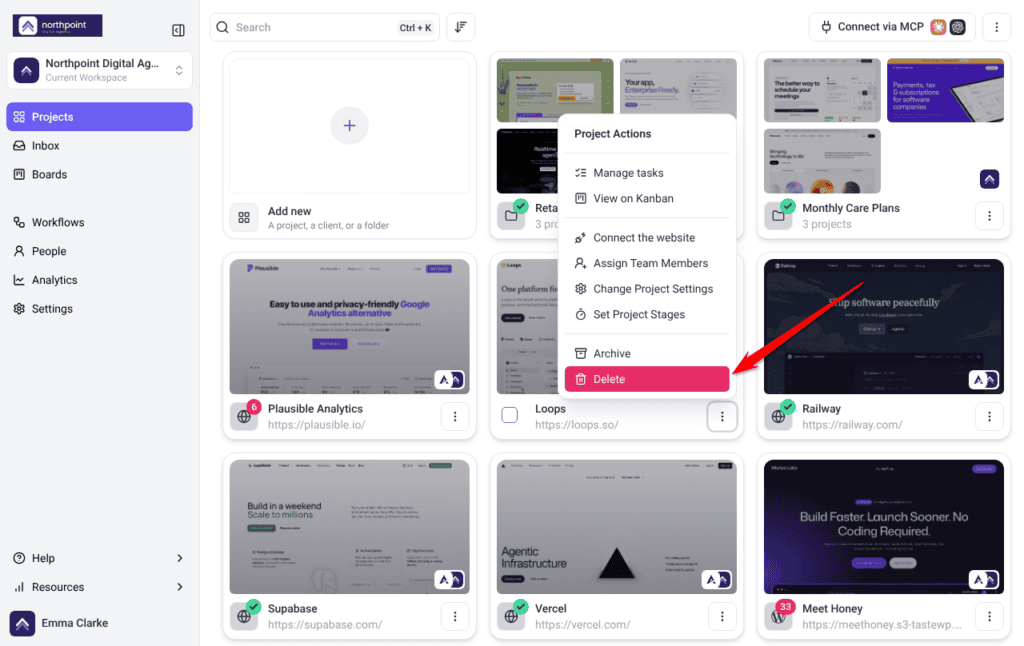
The Project Actions menu
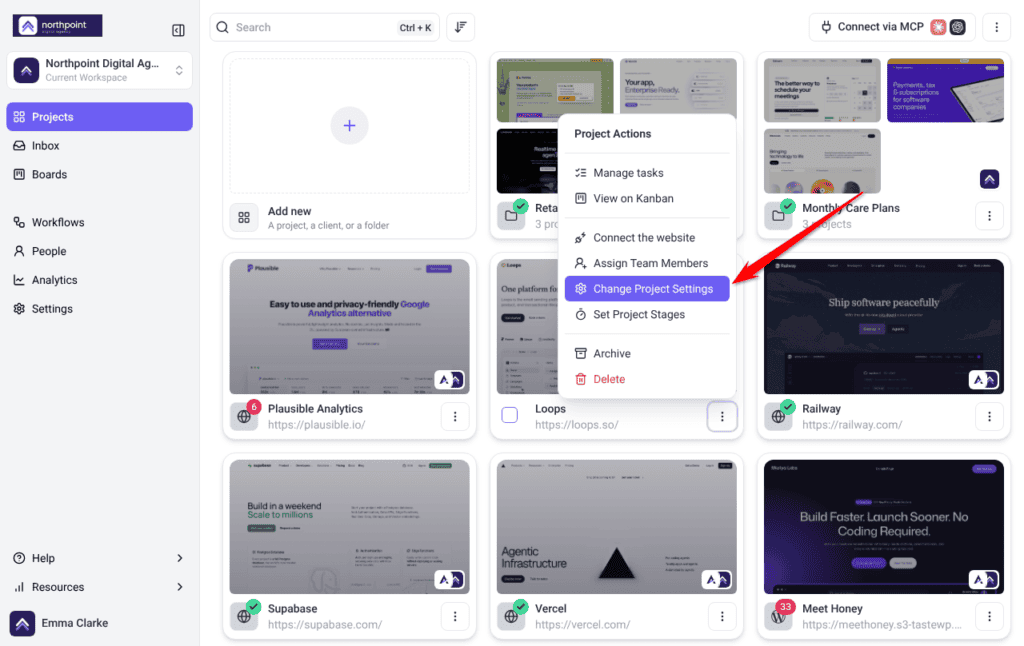
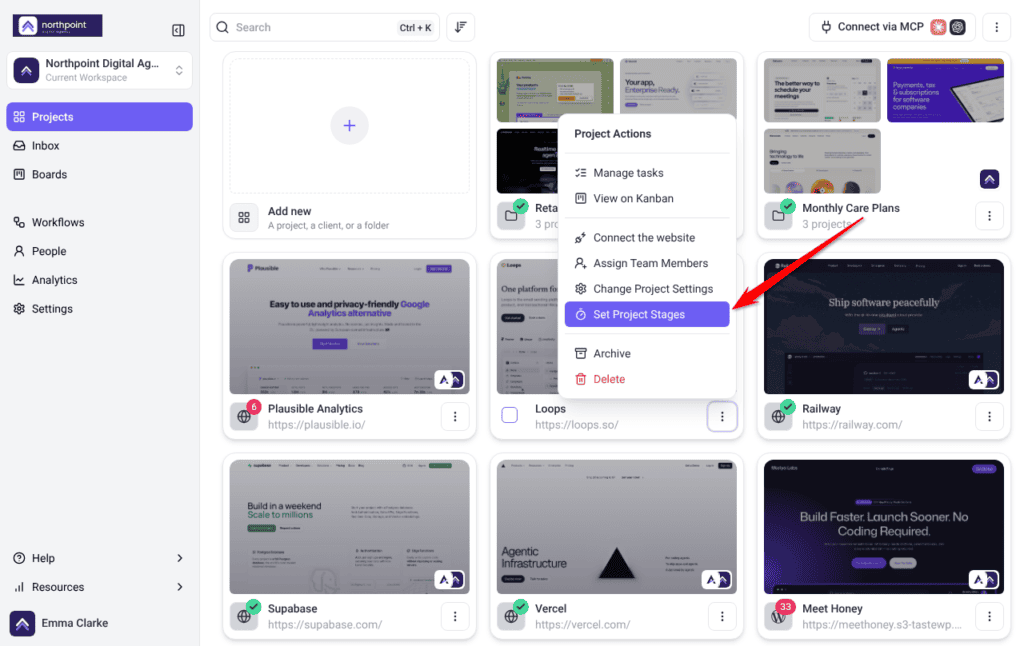
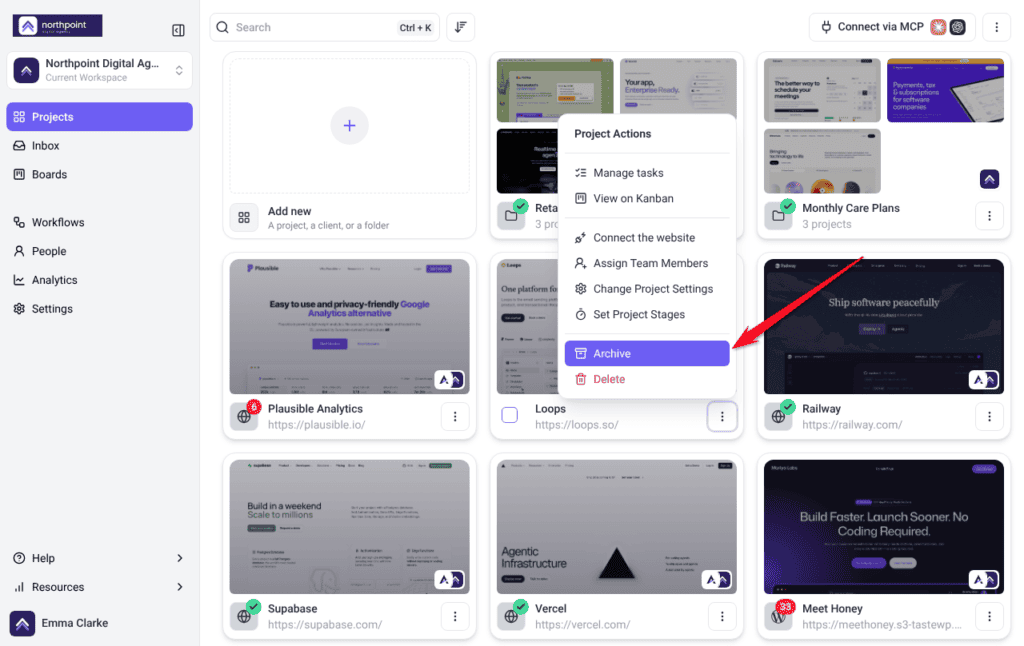
Alongside the hover buttons, each card carries a ⋮ menu headed Project Actions. This is where project-level management lives, as opposed to the day-to-day work. What appears depends on your permissions, so two people may see different options on the same project.
| Action | What it does | Read more |
|---|---|---|
| Manage tasks | Opens this project’s tasks in the Inbox. | |
| View on Kanban | Opens this project’s tasks on Boards. | |
| Connect the website | Gives you a script to add to the site’s pages, for sites behind a login or not on WordPress. Not shown on design projects. | Learn More About Connecting A Site |
| Assign Team Members | Chooses who works on this project. Assigned people appear in the avatar stack on the card. | Learn More About Assigning Work |
| Change Project Settings | Opens this project’s own settings, separate from your workspace settings. | Explore Project Settings |
| Set Project Stages | Tracks the project through its lifecycle. A paid feature — on lower plans this opens an upgrade panel. | Discover Project Stages |
| Archive | Clears the project out of the main view, frees its slot, and keeps everything recoverable. | Learn More About Archiving |
| Delete | Removes the project and all its tasks and activity permanently. | Read Before You Delete |

Archived projects
Archiving does not delete anything — it moves a project out of the main view, frees its slot, and keeps its tasks and history intact. Everything you have archived is reached from this screen via Projects Settings → Archived Projects, and can be brought back from there.
Archiving, restoring, and what happens to a project’s tasks in the meantime are covered separately. Discover How Archiving Keeps Your Work Safe.
Finding a project
Searching
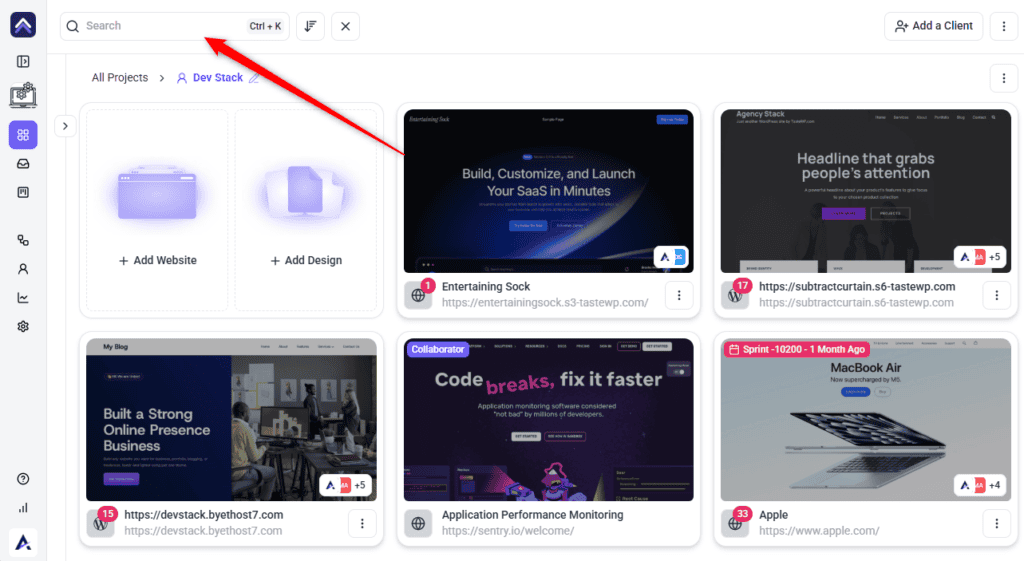
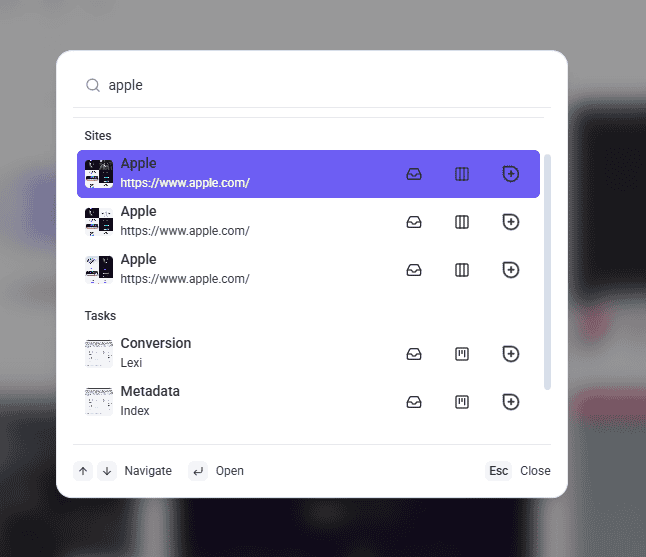
Search is the quickest way to reach a project you can name. It is a button rather than a text box: selecting it (or pressing Ctrl + K) opens a search dialog that matches projects, tasks and URLs as you type.
Instructions:
- Select Search at the top of the screen, or press Ctrl + K. Type into the dialog that opens. To narrow the Projects screen itself rather than jumping straight to a result, pick the row carrying your search term once matching projects appear. If you do not see a Search control at all, your role does not have access to it.
- If results look wrong, select Clear search filters. This resets the search and every filter at once — a filter left on is the usual cause of a “missing” project.
Filtering by type
Filtering narrows the screen to one kind of project. It is most useful when you work across websites and designs at once and only want to see one of them.
Instructions:
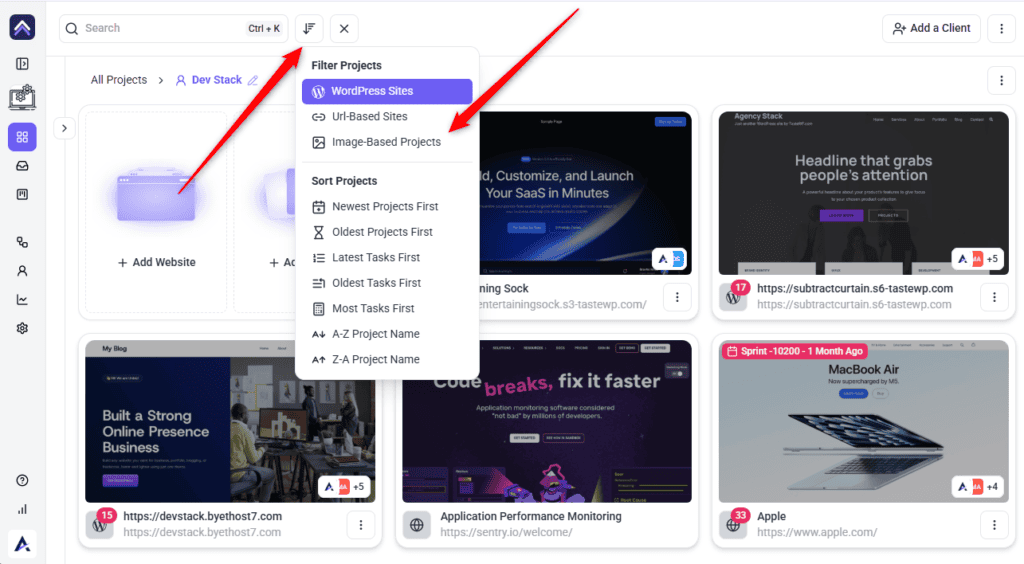
- Open the Filter Projects menu.
- Switch on the types you want to see. Filters combine, so leaving all three off shows everything.
| Filter | Shows |
|---|---|
| WordPress Sites | Projects connected through the WordPress plugin. |
| Url-Based Sites | Projects added by URL. |
| Image-Based Projects | Design and image projects. |
Sorting
Sorting changes the order projects appear in, which matters most once you have more than a screenful. Where search answers “which project”, sorting answers “which project needs me first”.
Instructions:
- Open the same menu and find Sort Projects.
- Choose an order. If the option opens an upgrade panel instead of applying, sorting is not included on your plan.
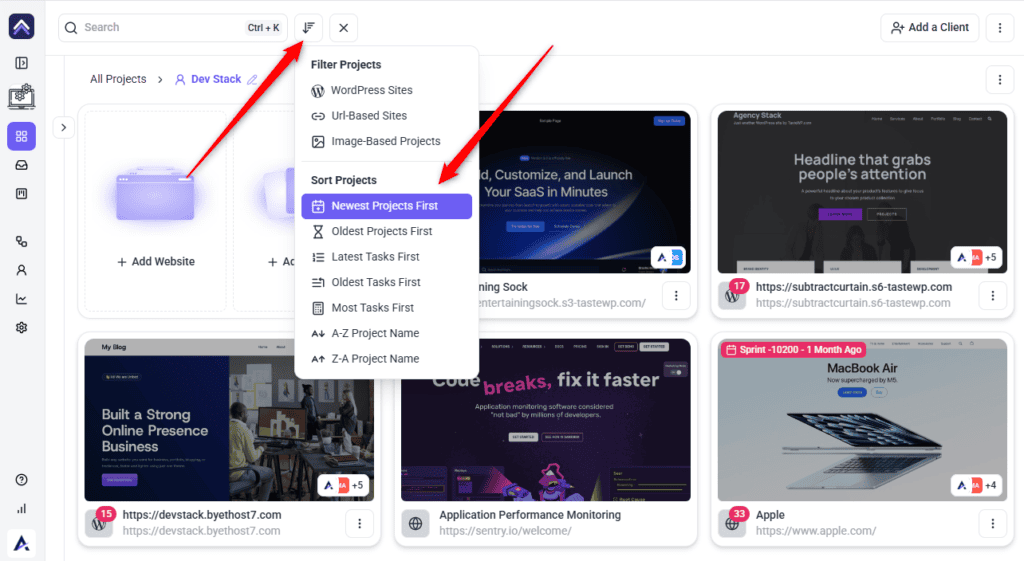
| Sort | Useful for |
|---|---|
| Newest Projects First | Recent additions. |
| Oldest Projects First | Long-running work. |
| Latest Tasks First | Where activity is happening right now. |
| Oldest Tasks First | Work that has been waiting longest. |
| Most Tasks First | The projects carrying the heaviest load. |
| A-Z Project Name | Finding a project alphabetically. |
| Z-A Project Name | The same list, reversed. |
Combining search, filters, and sort
All three apply at once, which is what makes them useful and also what makes projects seem to disappear.
| To find… | Do this |
|---|---|
| Where your team is working right now | Clear filters, then sort by Latest Tasks First |
| Work that has been ignored longest | Sort by Oldest Tasks First |
| Your heaviest projects before planning a week | Sort by Most Tasks First |
| Only the sites you can install plugins on | Filter to WordPress Sites |
| Design work rather than websites | Filter to Image-Based Projects |
| One specific client’s site | Search by name, or open their folder |
Working with several projects at once
Most of the screen works project by project, but two shortcuts let you handle several together. Both are easy to miss because neither is a visible button until you start.
Selecting multiple projects
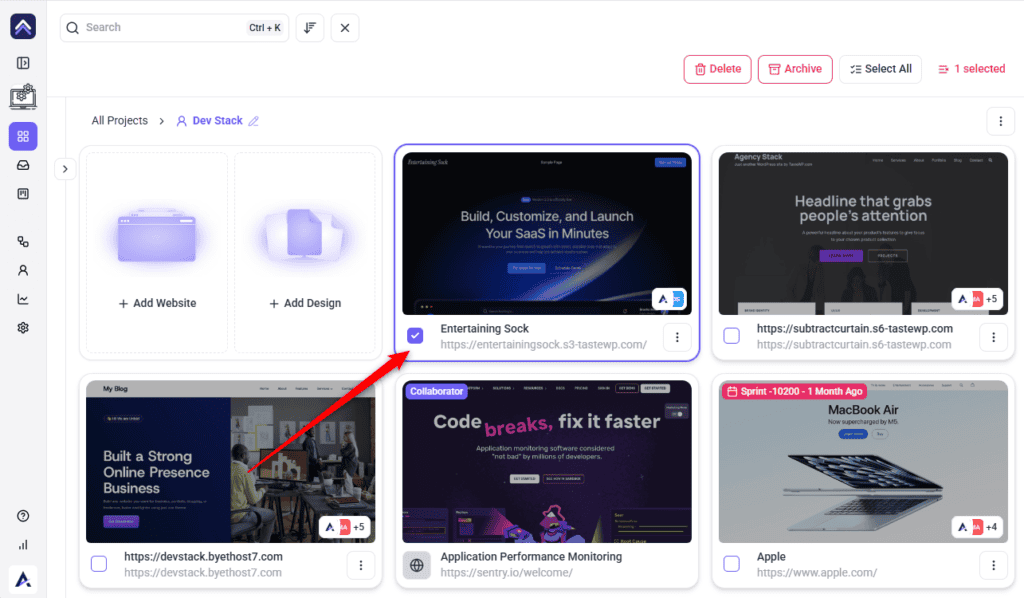
Selection lets you act on a group of projects in one go — archiving a finished client’s five sites, for example, rather than opening each card in turn.
Instructions:
- Hover over a project card. A checkbox appears in its corner. It is hidden until you hover, which is why the feature is easy to miss.
- Select the checkbox. The project is selected, and checkboxes now stay visible on every other card so you can carry on picking.
- Select the other projects you want to include.
- Apply your action to the whole selection. Archiving several at once confirms with the number handled, such as “5 projects successfully archived”.
Creating a folder by dragging
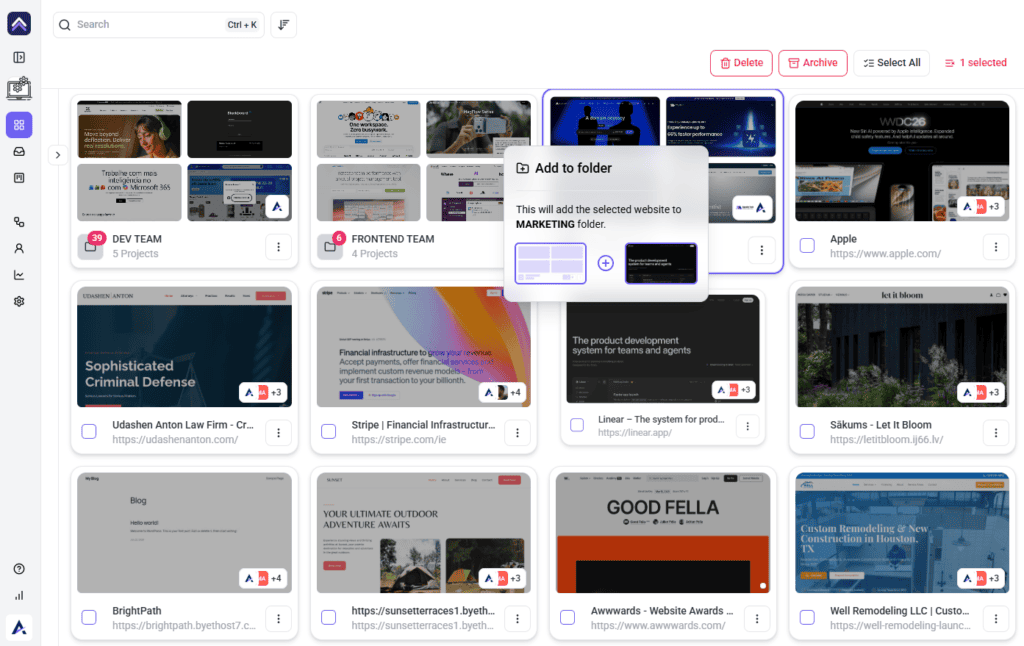
The quickest way to start grouping projects is to drag one onto another. It saves opening the folder panel and picking projects from a list.
Instructions:
- Drag one project card on top of another. A Create a Folder preview shows both projects.
- Drop it. The Create a New Folder form opens with both projects already added. Name the folder, add team members if you want, then select Create Folder.
- Drag further projects onto the folder to add them.
Folders
Create one from Projects Settings → Add Folder. To file an existing project, drag its card onto the folder, or choose the folder under Add this project to a folder in its project settings.
Creating folders, assigning projects and team members to them, and managing them over time are covered separately. Explore Adding And Managing Folders.
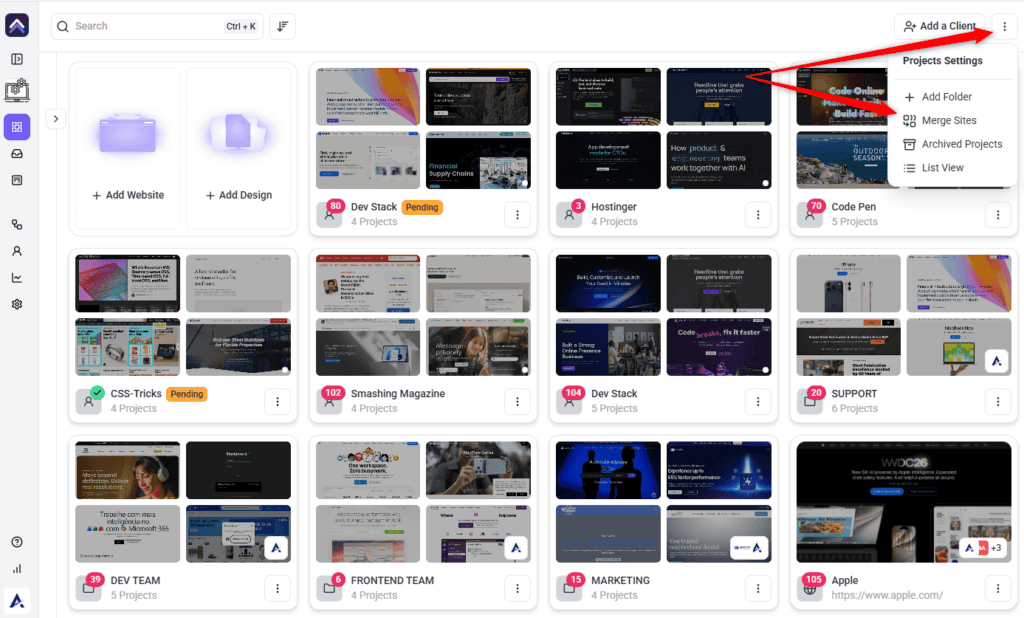
The Projects Settings menu
| Option | What it does |
|---|---|
| Add new | Opens What do you want to add?, for adding projects and folders. |
| Add Folder | Creates a folder to group projects into. |
| Merge Sites | Moves or copies tasks between two projects. |
| Archived Projects | Opens everything archived, where it can be restored. |
| List View / Grid View | Switches between cards and a denser list. |
Grid view is easier to scan by screenshot, which suits a handful of visually distinct sites. List view fits far more on screen once you are managing dozens, and shows more detail per project.
Which view suits which way of working is covered separately. Find Out Which View Suits You Best.
Project limits
Your plan sets how many active projects you can have. Archived projects don’t count. When you reach the limit you can’t add another. If you are over it, for example after a plan change, the extra projects show Project Locked with an Upgrade Now button. Selecting it opens You Ran Out of Project Slots, which suggests you either upgrade or remove inactive projects to free up space.
Known limitations
Where the screen stops:
- The screen shows one workspace at a time. There is no combined view across workspaces.
- Sorting and some filters are paid features, and show an upgrade prompt on lower plans.
- Deleting is permanent. Archiving is the reversible option.
- Projects cannot be moved between workspaces.
- Available actions depend on your role, so two people may see different buttons on the same project.
- Project stages are a paid feature and show an upgrade prompt on lower plans.
FAQs
What is the difference between a website and a project?
They are the same thing. Projects is the current term and covers designs and images as well as websites.
Do I need to install anything to add a site?
No. Adding by URL works on any site with no access required. Installing the WordPress plugin or a script unlocks more, but is optional.
What is the difference between archiving and deleting?
Archiving hides a project from the main view and can be undone from Archived Projects. Deleting removes it and its history permanently.
Can I move a project to another workspace?
No. Projects belong to the workspace they were created in.
Why can my colleague see buttons I cannot?
Most actions are permission-based, so what appears depends on your role in that workspace.
How many projects can I have?
That depends on your plan. Archived projects don’t count toward it. Projects over the limit show Project Locked, and selecting Upgrade Now on one opens the “You Ran Out of Project Slots” prompt.
What is the coloured badge on some of my project cards?
That is a milestone. It shows the milestone’s name and how far away its due date is, and its colour changes as the date approaches or passes. Select it to open the milestone.
What is the difference between a project stage and a task status?
A status tracks one piece of work; a stage tracks the whole project through its lifecycle. Stages are set from Project Actions and are a paid feature.
Can I archive several projects at once?
Yes. Hover a card to reveal its checkbox, select the projects you want, then apply the action to the whole selection.
Is there a quicker way to create a folder?
Drag one project card onto another. The Create a New Folder form opens with both projects already added.
Does Add a Client create a project?
No. It creates a client (Beta), with a workspace of their own. Only the project options in Add new create projects: Drop a URL, Manage a WordPress site, Upload designs or PDFs and Connect to Figma.
Can I add designs, or only websites?
Both. In Add new, Upload designs or PDFs creates a project from images and design files, and Connect to Figma creates one from a Figma link. You comment on it exactly as you would a website.
Can I group projects by client?
Yes, using folders. Create one from the Projects Settings menu, then drag project cards onto it.
Common issues
- A project is missing. Work through four checks in order: are you in the right workspace, is a search term still applied, is a filter still on (use Clear search filters), and is it in Archived Projects. Only after all four should you suspect deletion.
- No checkbox appears when you hover a card. Selection is not available to Team Members or Collaborators. Ask an administrator about your role.
- A card shows but its actions do not. The project is locked because you are over your plan’s limit. Archive something, or upgrade.
- The screen is empty. Either this workspace has no projects yet, or a filter is hiding them all. Use Clear search filters.
- You cannot add a project. You may have reached your plan’s project limit, or your role may not include adding projects. Archived projects don’t count toward the limit, so archiving finished work frees a slot.
- A sort option opens an upgrade panel. Sorting is not included on your plan.
- An action is missing from a card. Actions are permission-based. Ask an administrator what your role allows.
- A project screenshot looks wrong or outdated. Screenshots are generated when the project is added. Open the project to see it as it is now.
- You deleted a project by mistake. Deletion is permanent and cannot be undone from the dashboard. Contact Support as soon as possible.
Conclusion
The Projects screen is deliberately simple: add the sites you work on, then use the card actions to get into the work. Add one by URL to start, select Open on its card, and leave a comment — that is the whole product in about two minutes.
Once a project is on the screen, the next step is configuring it to suit how you work.
Tips & best practices
- Add your first site by URL rather than installing anything. You can always connect it properly later.
- Check the workspace before concluding a project has vanished — it is by far the most common cause.
- Use folders by client, not by status. Statuses change; clients do not.
- Archive finished work rather than deleting it. It frees the slot and keeps the history.
- Switch to list view once you pass a dozen projects. Screenshots stop helping and start scrolling.
- Sort by Latest Tasks First at the start of the day to see where activity actually is.